Introduction
With a fleet of 10 hats built, deployed and synchronised, it is time to focus our attention to the other core component in our system: the observer.
The system consists of a camera that records the motion of the players of Synch.Live, and a computer that processes this video, by tracking the green pilot light at the top of each hat and producing the trajectories of all players. Moreover, once these trajectories are computed, the system performs periodic information-theoretic calculations over a given time window, and the results of these calculations will inform how synchronised the blinking lights are on the hats.
In this post, I document how we built the hardware, I play with setting up the Raspberry Pi camera and streaming footage from it with a web server, and attempt to install OpenCV and required packages.
This article is part of a series describing my collaboration with Hillary Leone on Synch.Live. To summarise, Synch.Live is a game in which of groups of strangers try to solve a group challenge, without using words. We will use a specially-designed headlamp, simple rules and a just-published algorithm to create the conditions for human emergence. A discussion about emergence and the goals of the project is in a previous article.
The Kit
- Raspberry Pi 4 with 8GB of RAM, a case and cooling fan. We used the starter kit by Labists
- Raspberry Pi high quality camera
- set of C-mount lens for the camera
- tripod or stand
- set of adjustable clamps
- velcro
High Quality Camera
The RPi High Quality camera is impressive for its price and very useful for many applications from time-lapse photography to home-brewed physical security systems. It features a Sony-IMX477 sensor, of 7.857mm diagonal (which allegedly makes it a 1/2.3” sensor), with 12.3MP resolution and rather high sensitivity. Actual sensor size is 7.56 x 5.47 mm so an aspect ratio of about 4:3. The sensor is 5.6 times smaller in diagonal than the 35mm FX/full-frame sensor (which has a diagonal of ~43mm), thus the crop factor is 5.6.
Lens
The RPi High Quality camera supports C-mount and CS-mount lens. This is the same mount for 8mm film, as well as a standard in CCTV cameras, so besides the RPi lens, one could find some nice lenses for it in an old camera shop as well (I’m sure I’ll play with this one day).
The CS and C mounts have the same screw-in mechanism of the same depth and circomference, but the lens is father away from the camera in C-mount, so a little adapter ring comes with the camera.
I was a little dazzled by the choice of lens on the page, so we went for the starter kit.
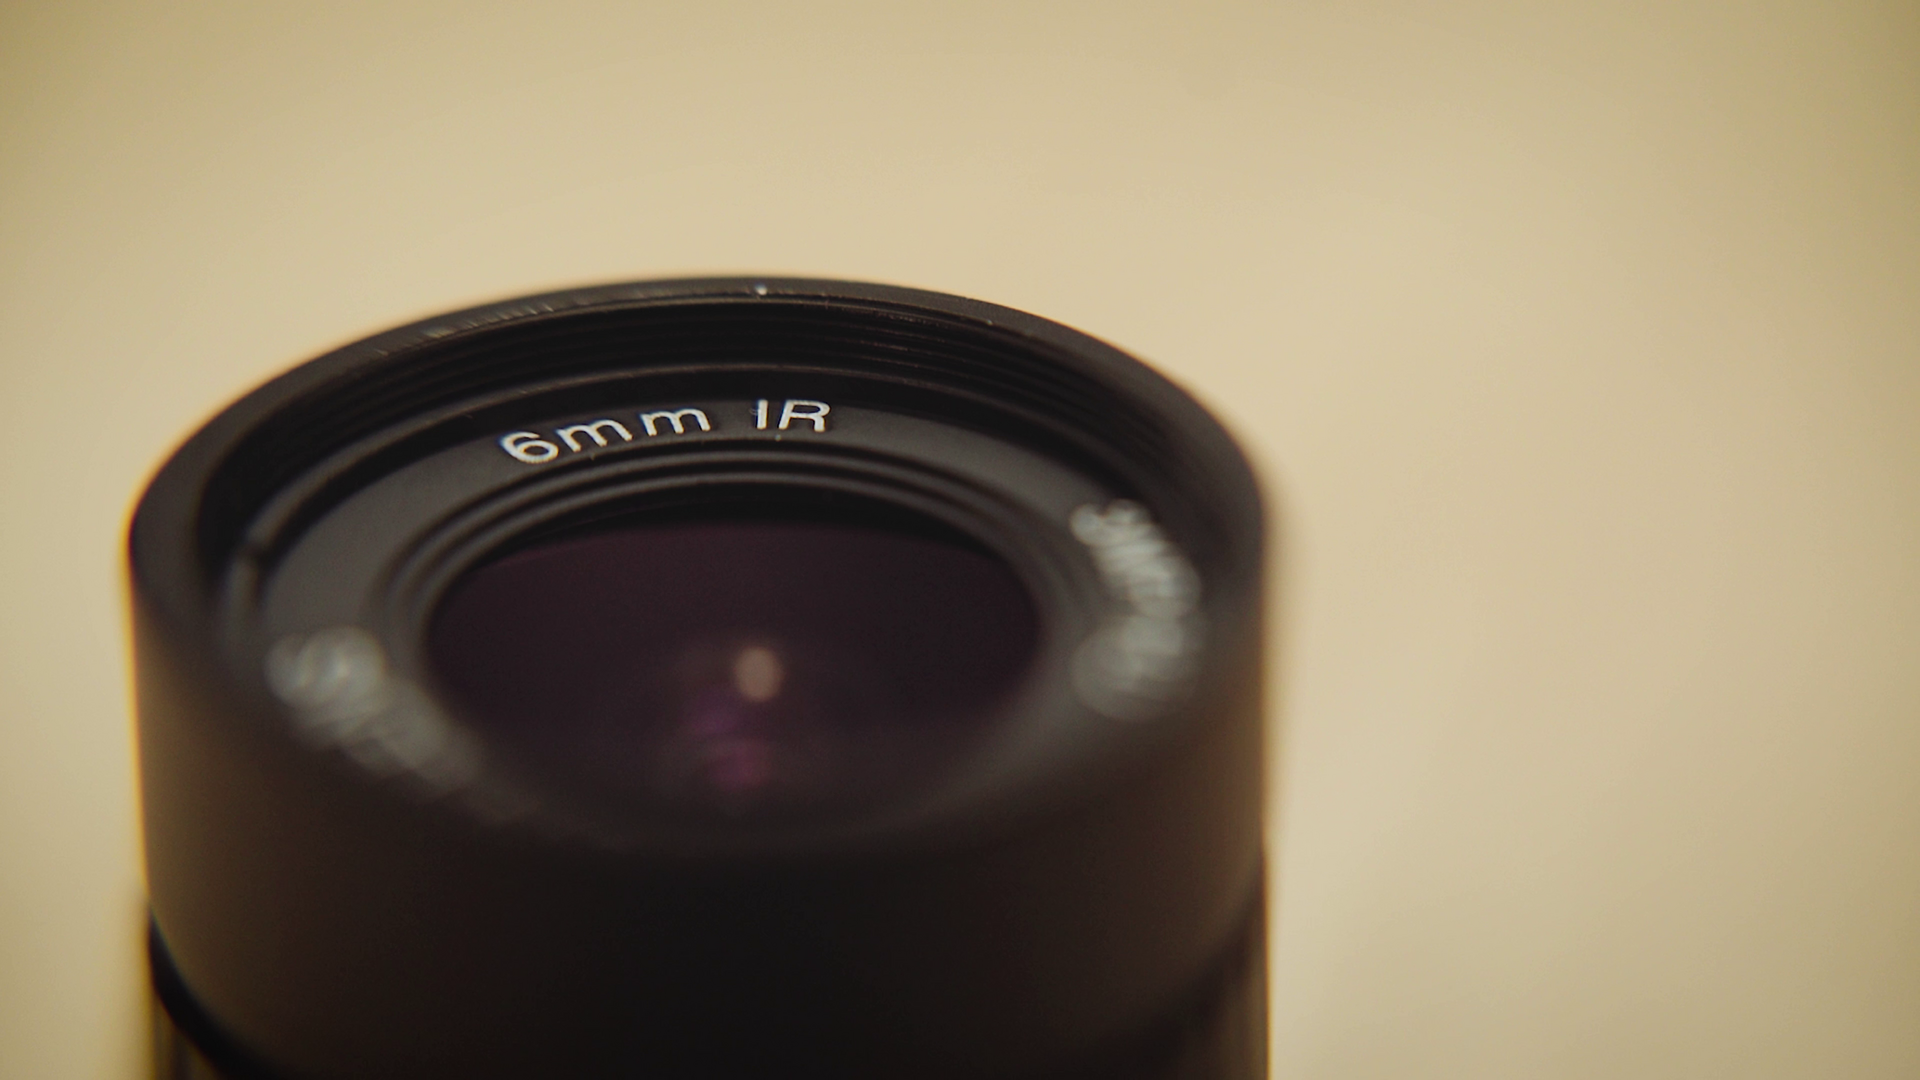
Our widest lens has a 6mm focal length. This lens has a smaller resolution (3MP) but a wide aperture of 1.2. Even so, the High Quality camera is a good choice despite not making use of all the resolution in some cases, as it has high sensitivity and better colour accuracy then the normal RPi camera, both of which are quite important when filming at night-time and doing object detection based on colour.
An alternative are M12 lens, which are smaller, lighter and cheaper, also very popular in the CCTV world. These work natively on the Arducam, but require a convertor to be used on our camera. For example the Arducam ulta-wide 2.72mm M12-mount lens. It’s likely that vignetting or a fisheye effect may occur when used on the High Quality camera because they are designed for smaller sensor sizes, these are also likely to have smaller resolution as well, yet we may still find these lenses useful despite the drawbacks if we need a larger angle of view.
Angle of view
To better understand what each focal length means for our sensor size, it’s worth refering to the angle of view (AOV), a value based on the sensor size and focal length. Similarly, depending on how much space the Synch.Live players have to move and how tall the camera is set, we calculate the the AOV required by our experiment and choose a lens that matches that on our specific sensor size.
The AOV is different depending on the sensor diagonal, height and width, and these are used on a case-by-case basis because sensors (especially in cinema) have various aspect ratios. Recall ours is 4:3, so we should also aim to put the players in a space with the same aspect ratio and then use the diagonal calculation. Otherwise one may have to calculate the sides and get a lens with a slightly larger AOV to make sure the whole space fits in frame.
To calculate AOV of a camera in Python, assuming l can be either of the diagonal/height/witdh of the sensor, and f is the focal length of the lens, we use the arctangent function and convert from radians to degrees.
To calculate AOV for an experiment, l takes the diagonal/height/width of the space where the players move, and f is the height the camera is set at.
def aov(l: float, f: float) -> float:
    aov_rad = 2 * math.atan(l / (2 * f))
    aov_deg = aov_rad * 180 / math.pi

    return aov_deg
It results that our 6mm lens on the RPi high quality camera has a diagonal AOV of ~66.43°. The vendor advertises 63° although that may be because of calculating the horizontal size and possible rounding error. This lens is perfect for a 20mx15m space with the camera set at a height of about 40m.
For (photographic) context, a 6mm on the RPi High Quality camera is about ~33mm on a 36x24mm sensor (A.K.A. 35mm film/FX/full-frame, which has ~43.26mm diagonal). The crop factor describes the ratio between any sensor size and the 35mm sensor. So the same result is obtained when multiplying the focal lens with the sensor’s crop factor (which is 5.6).
As we may need to use other lens depending on the experimental setup, we will likely explore wider angle lens:
- 3.2mm C-mount lens, the spec claims the AOV is 120° but my calculation gives 101.67° on the High Quality camera
- 2.8mm to 12mm varifocal C-mount lens, the spec claims different AOV than my calculation yields, which is 140° for 2.8mm and 36.25° for 12mm.
Implementation
To setup the observer, we first put together the hardware, image the SD card, and prepare it to deploy configuration with Ansible. The specific steps are described below. The steps involving software, namely the ones following and including step 5 below, can be automated with an Ansible playbook.
Hardware
1) Plugin camera connector
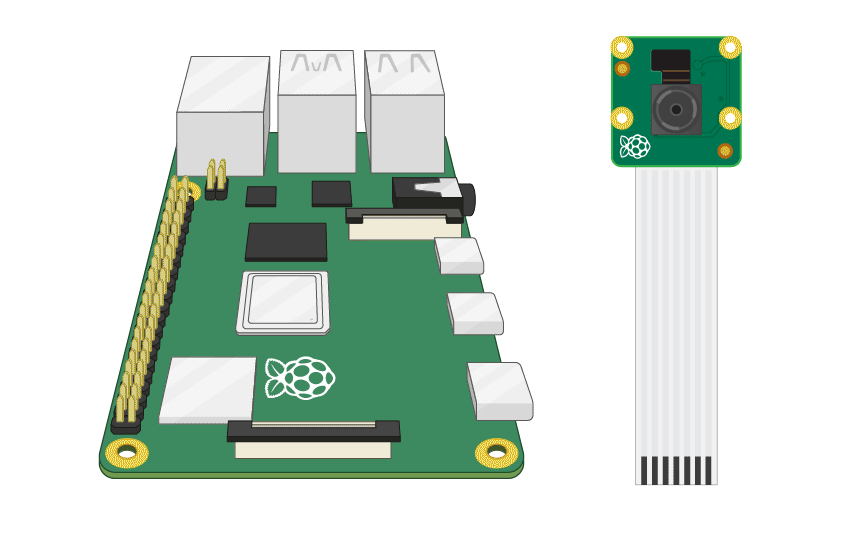
The camera module connects to the RPi using a ribbon connector.
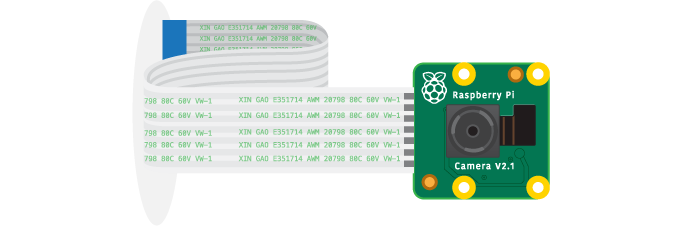
The ribbon is easily detached from both sides. Connect the ribbon to the RPi first, and fix it in place as shown in the animation. Fold it away from the side with the USB ports before installing the fan.
2) Attach fan
The fan has a quiet mode and a full power mode depending on what GPIO pins it’s connected to. The former is pins 1 and 6, the latter is 2 and 6, which is what we went for to make sure the RPi won’t overheat when doing all those graphics for object detection and tracking.

3) Camera and Lens
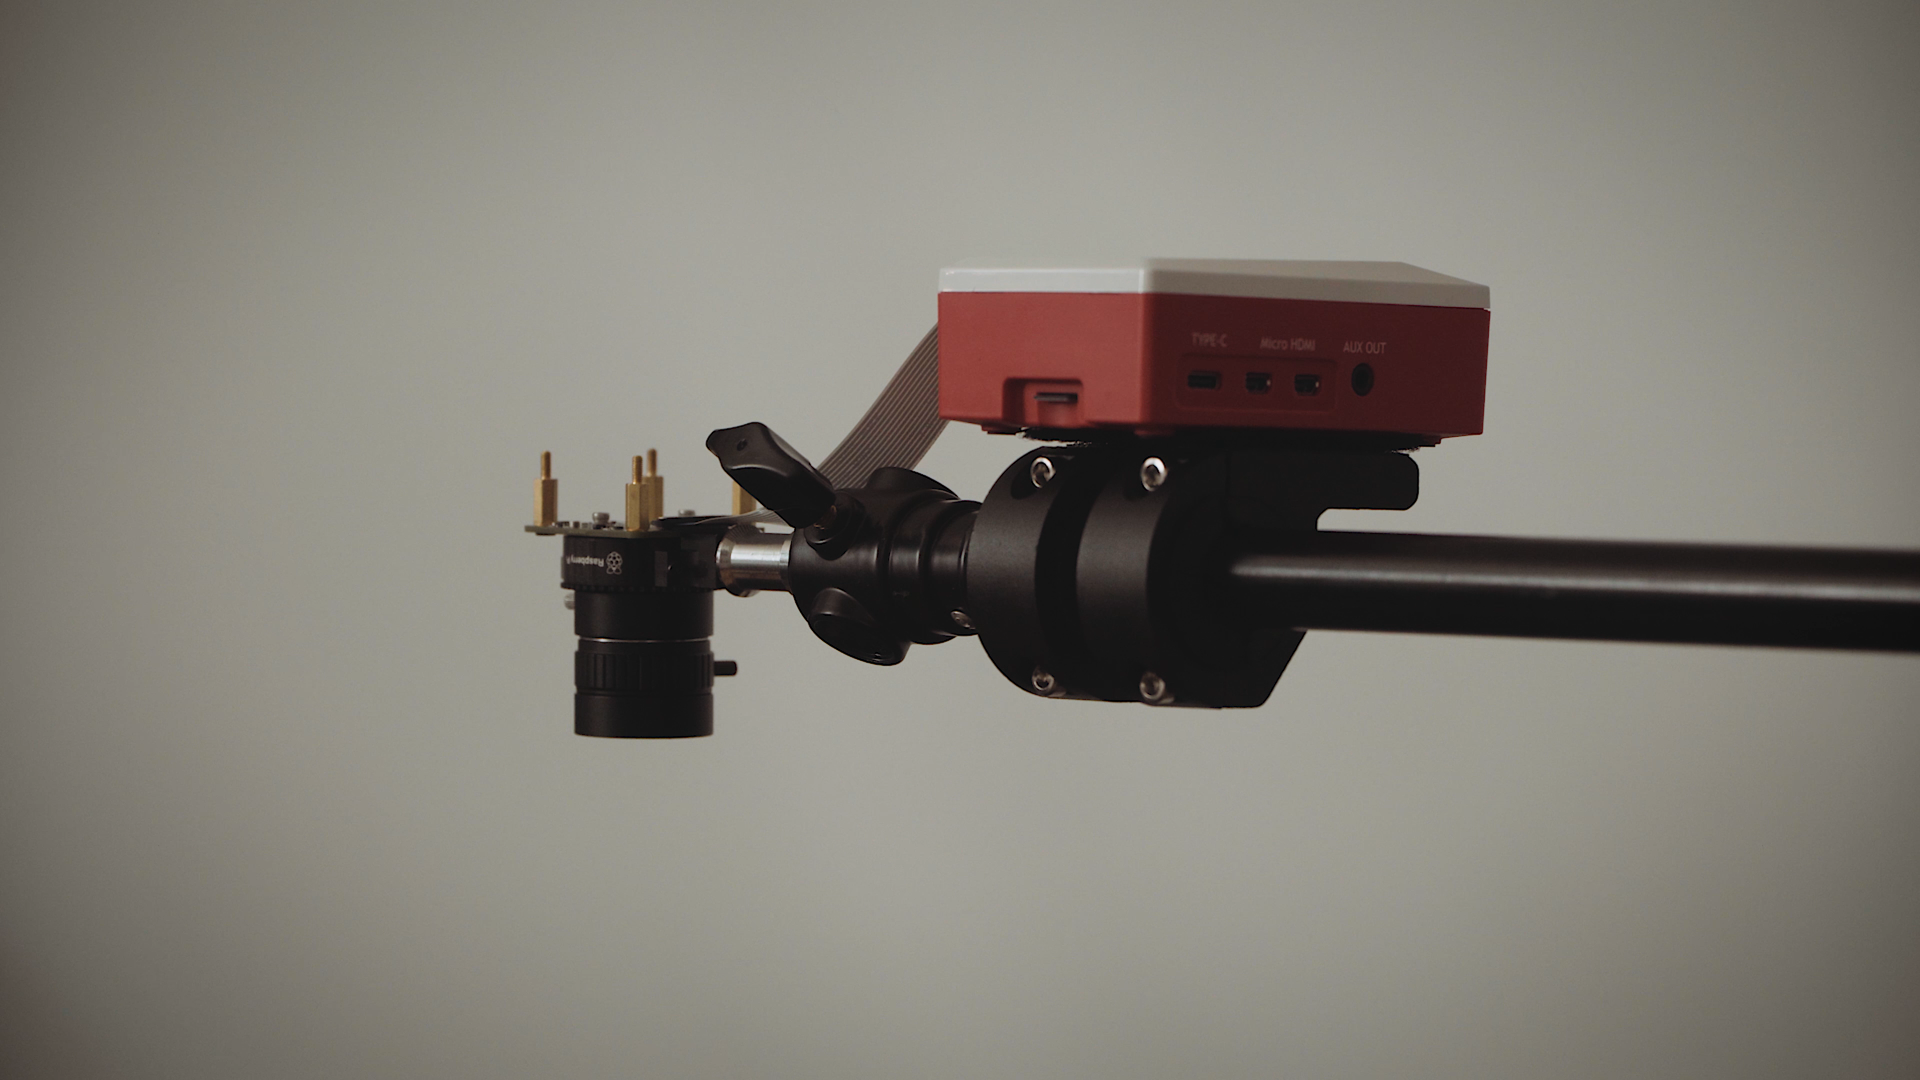
It’s worth mounting the camera on a mini-tripod during setup. The RPi camera has a standard (quarter-inch) tripod screw.
To set up with the 6mm lens, which is a CS-mount lens so it does not require any adapter, we followed the guide. Screw the lens in, tighten the screw on the mount, and make sure turning the focus wheel does not unscrew it.
Finally, our system looks like this:

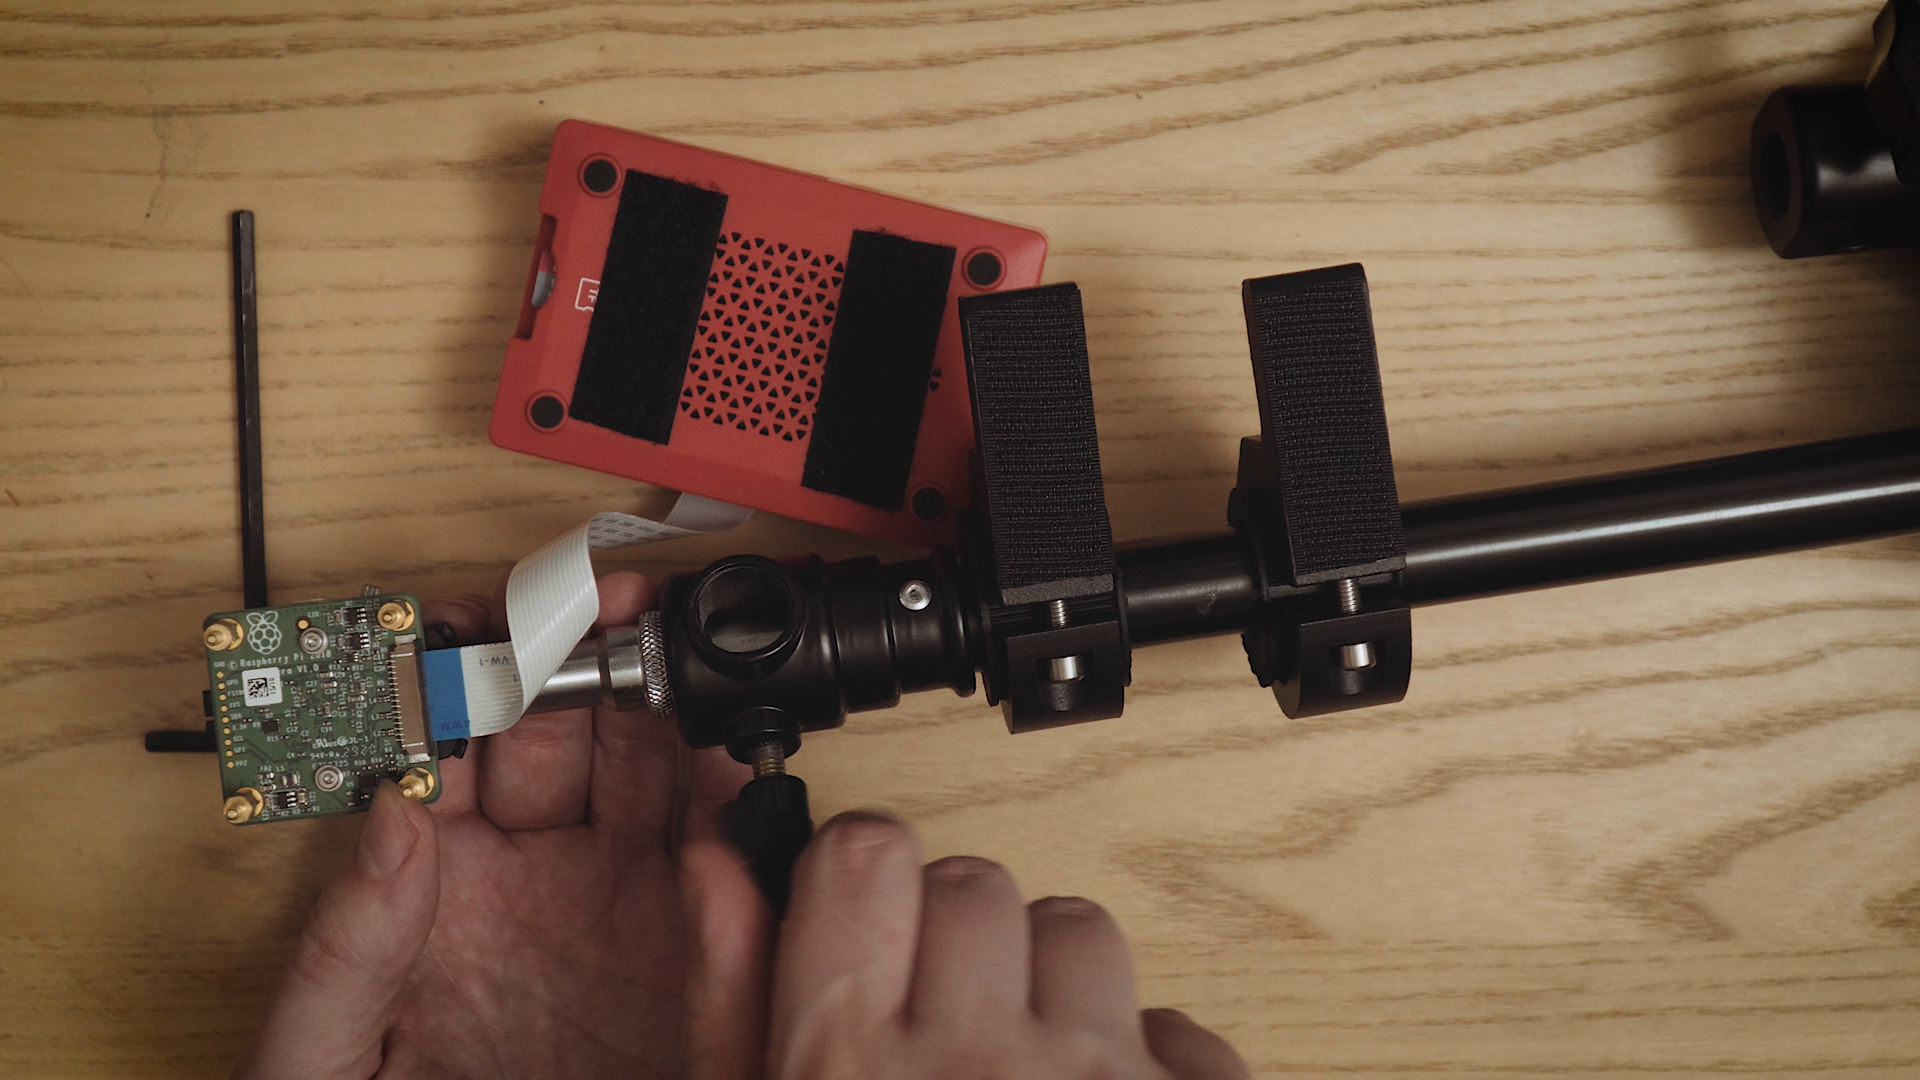
3) Support
We attach clamps to the computer using Velcro so it’s easier to fix it onto the tripod/stand that will hold the camera. Since the camera has a universal tripod screw we can use any of the plethora of photographic tripods and contraptions available.
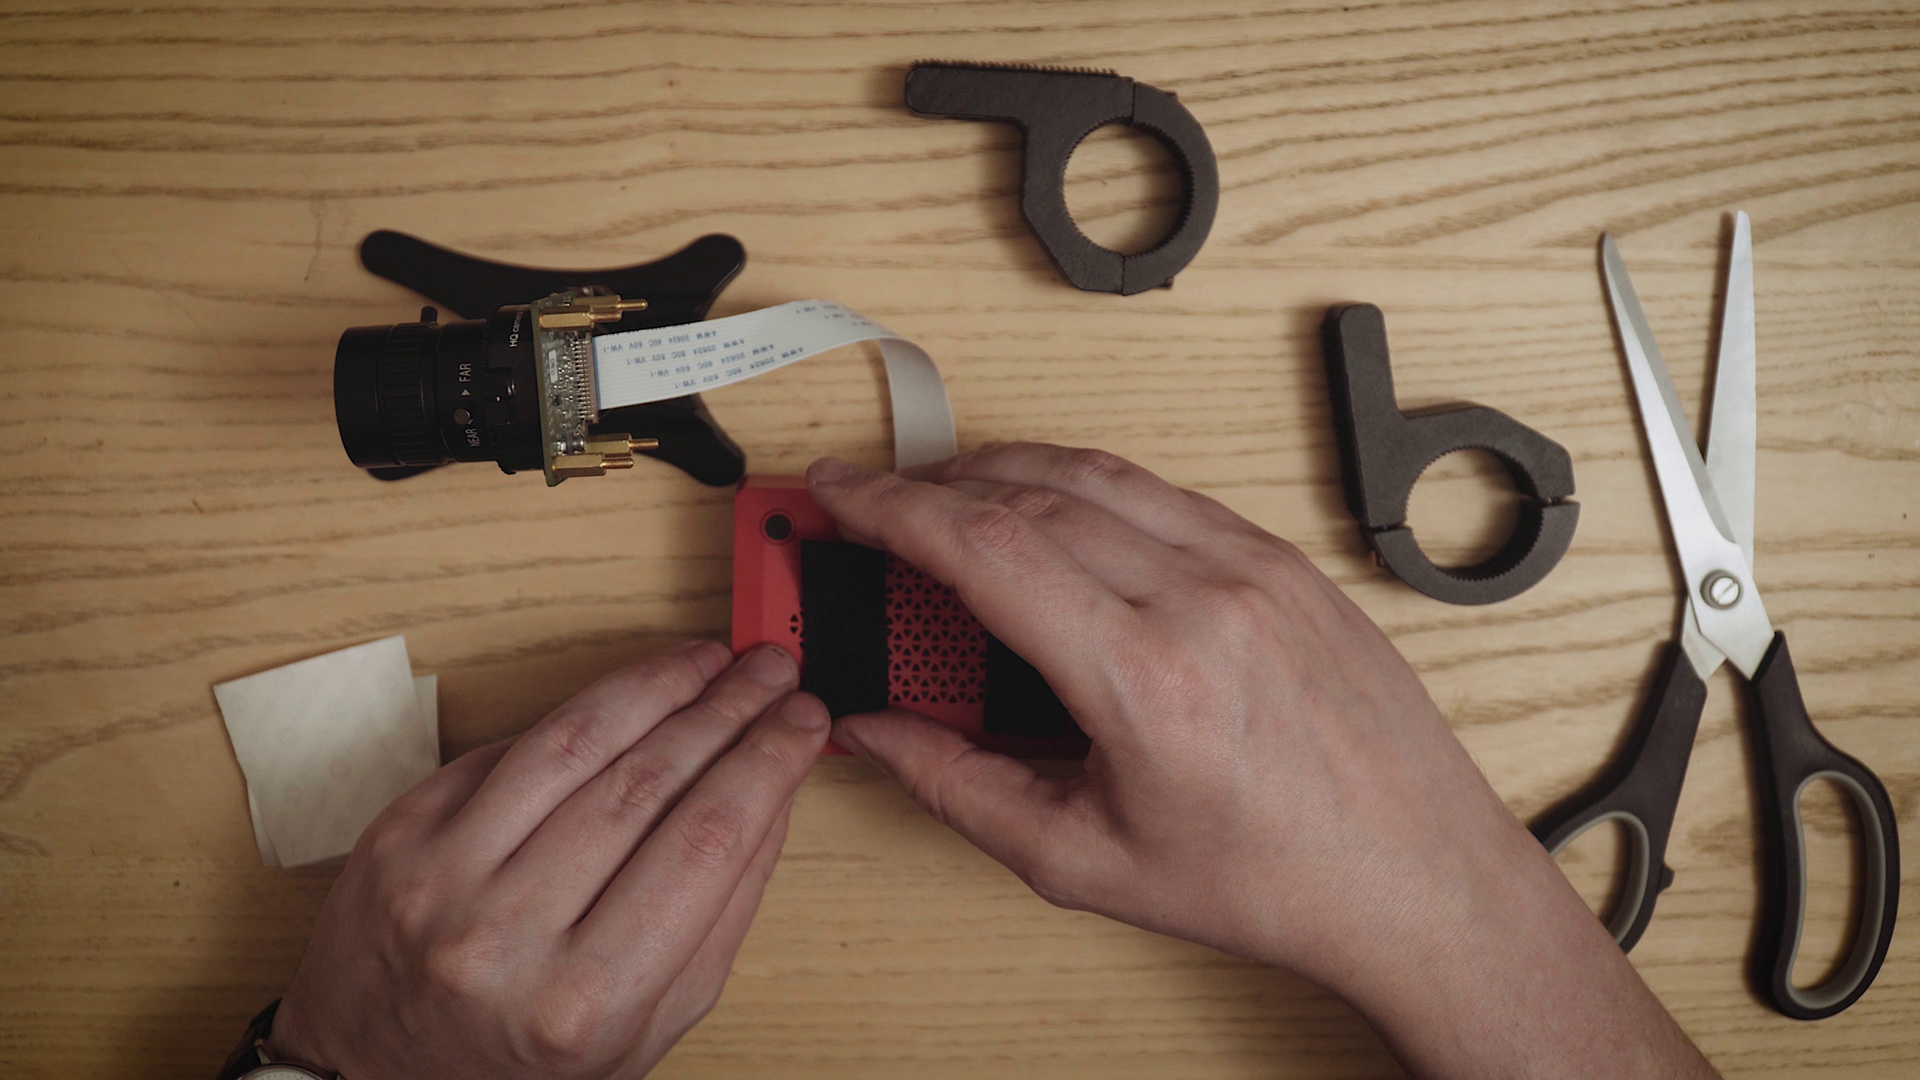
The camera is mounted to a stand and the computer is attached with the clamps. Neat.
Using a C-stand will be particularly useful if we setup the observer out a window in a tall building. This allows easily pointing the camera downwards and a lot of control over the angle.
Configuration
4) OS installation
The kit for the RPi 4 allows easy access to the SD card, so unlike the setup for the players we don’t have to have the SD card ready before building the hardware.
We install Raspberry Pi OS Lite on the SD card same as for the players.
5) Preconfiguration
Almost identical to the setup process on the players documented in part 4, preconfigure the card by enabling SSH, connecting to wireless, setting the hostname to observer and the static IP to 192.168.100.100, and copying the SSH keys.
6) Enable camera
Done with raspi-config where 0 means that the flag is enabled.
$ raspi-config nonint do_camera 0
Software
7) Install system packages
OpenCV (CV for Computer Vision) is an open source graphics library that is ubiquituous in many applications combining AI with any sort of graphical input. There are plenty of smart algorithms as well as filters built in, and whilst it’s mostly written in C++, there are bindings or APIs for many programming languages including Python.
In order to efficiently use OpenCV, there are a few packages and libraries to install that optimise it under the hood. For example, gfortran and libatlas allow low-level optimisation of linear algebra, which is heavily used in image processing. A number of build tools may also be required in case we wish to recompile OpenCV with new optimisations, and also may provide more details inside errors and stack traces if installed. We will also install libraries and codecs to deal with JPEG and motion-JPEG files, based on how the Pi Camera encodes the stream.
$ sudo apt install libatlas-base-dev gfortran
$ sudo apt install libjpeg-dev libjasper-dev
$ sudo apt install build-essential cmake pkg-config
8) Install Python packages
The camera requires the Python package picamera. Object detection and tracking makes use of OpenCV and the imutils package. The Python version of OpenCV used by the current build is version 4.4.0.46 of opencv-contrib-python-headless.
There are four versions of OpenCV Python with various differences, depending on whether extra modules are to be installed (by using the contrib version) and whether we will be requiring a GUI. We work without a GUI entirely, as the observer is a server, so we choose the headless.
The specific package version 4.4.0.46 has been chosen as it’s the newest version which works in the Synch.Live system without error. Usually changes in OpenCV can be rather drastic so it’s best to have fine-grained control over specific versions in a project that relies on OpenCV to avoid unexpected backwards compatibility issues.
pip3 install picamera imutils opencv-contrib-python-headless~=4.4.0.46
Installing the above will install numpy and other related useful packages.
9) Interfacing with camera
It’s time to test whether the hardware setup was successful. The RPi provides the software raspistill and raspivid which can be used to control the camera. The command below takes our first image!
raspistill -o first-image.jpg

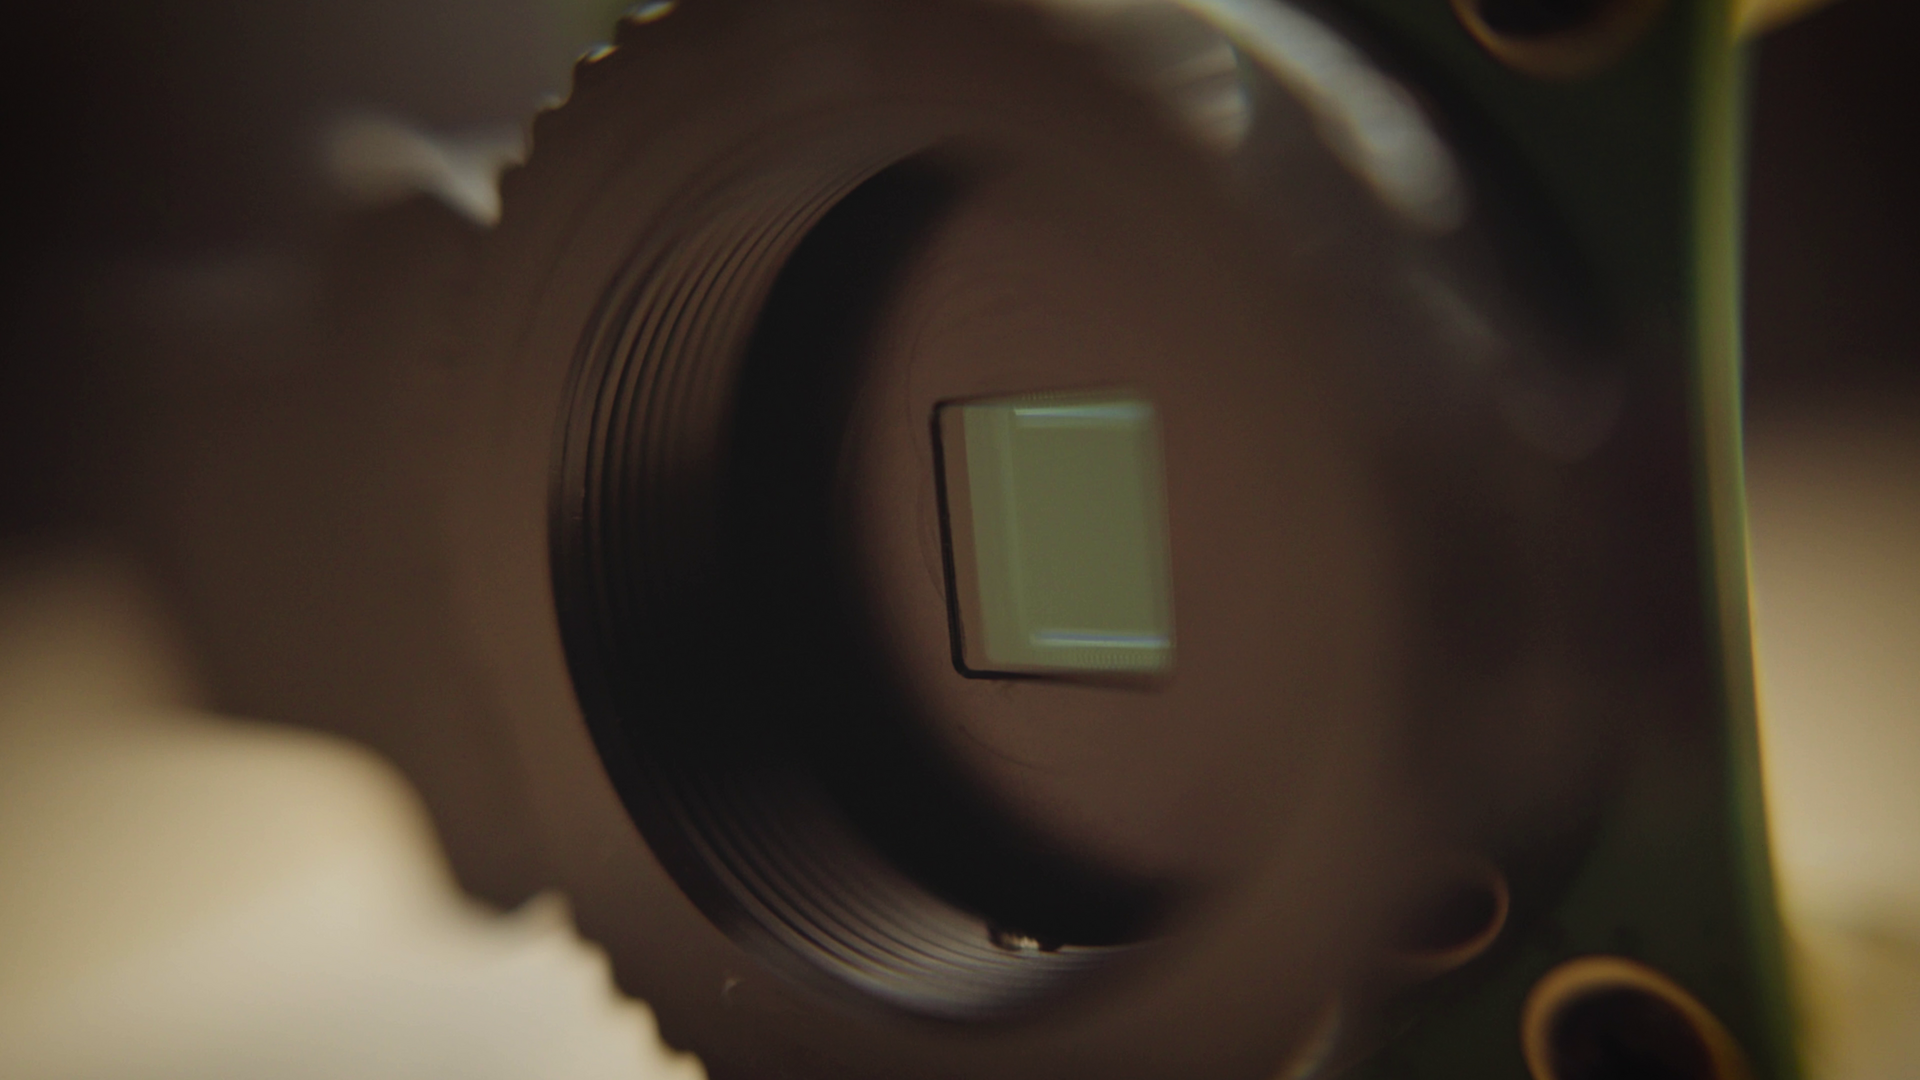
It isn’t that well focused, but it definitely looks photographic. Nice!
A note worth making is that only one application/thread at a time can access the camera stream. Errors may appear (for example, unable to access the camera) if the connection to the stream has not been closed by the previous application. This may happen quite a bit during testing so Killing the culprit process or restarting the RPi should fix this.
10) PiCamera in Python
The picamera package provides the PiCamera object which can be parametrised with the desired resolution and framerate. For now, we downscale to 480p (rather than 1080p) at 12fps (rather than 24), but I expect these will be calibrated according to experimental setup when the time comes.
Best practice is to let the camera warm up for a second before starting to fetch frames, and always to stop/release all the streams before closing the appliation.
The main usage of the camera is to record video, and the imutils library provides the tools to wrap up the feed from the camera into a VideoStream object, from which frames can be fetched one by one. To save the recorded video, OpenCV provides a VideoWriter.
For example, the code below records for 100 frames and saves them to disk to a file called output.mov.
import cv2
from imutils.video import VideoStream
from picamera import PiCamera

read_stream = VideoStream(
    usePiCamera=1, resolution=(640,480), framerate=12).start()
time.sleep(1)

codec = cv2.VideoWriter_fourcc(*'MJPG')
date  = datetime.datetime.now().strftime('%y-%m-%d_%H%M')
video_writer = cv2.VideoWriter(
    f'output.mov', codec, 12.0, (640, 480))

i = 0
while i < 100:
    frame = read_stream.read()
    video_writer.write(frame)
    i += 1

read_stream.stop()
video_writer.release()
The MJPG (motion JPG) codec does per-frame compression but not between frame compression. The file is saved as .mov, which is a more modern alternative to.avi.
Stream
11) Install Flask package
We wish to see whatever the camera sees. So without a screen, there needs to be a stream. The fastest most-lightweight and least-lines-of-code-required way to do it appears to be to setup a web server using Flask, which is a Python package and can be easily incorporated the existing system logic.
$ pip3 install flask
12) Create server and page templates
The Python3 file server.py initialises the Flask application and configures routes using function decorators. For each route, it returns a rendered HTML template. These templates live in a subfolder called templates/.
At route / is the homepage with the template in index.html. video_stream receives the camera output frame-by-frame. The video stream will be loaded inside the index.html page as if it were a static video or image file.
In order to create this video stream, a global variable output_frame is assigned to the latest frame to be streamed.
The streaming() function is where the frames are fetched from the camera and the output_frame is set.
This function can be extended with the object detection and tracking on each frame, or to save the current frame to disk. The output_frame itself can be a modified version of the input frame. To avoid blocking the front-end/webserver side all of this should happen on a separate thread.
generate_frame() is a Python generator which takes the global output_frame, converts it into a binary format and wraps it into a HTTP response which the server sees at the path video_feed.
Finally, to avoid issues of concurrency we use a lock wherever we access the stream produced by the camera as well as when we produce the output_frame.
The code below is a minimum working example to stream video from the camera to the web server. The expected directory structure is something like this:
├── server.py
└── templates
    └── index.html
templates/index.html:
<html>
  <head>
    <title>Synch.Live</title>
  </head>
  <body>
    <h1>Synch.Live</h1>
    <img src="{{ url_for('video_feed') }}">
  </body>
</html>
server.py:
from flask import Response, Flask, render_template
from imutils.video import VideoStream
import threading
import time

app = Flask(__name__)
app.debug    = True
app.threaded = True

stream = VideoStream(
    usePiCamera=1, resolution=(640,480), framerate=12).start()
output_frame = None
lock = threading.Lock()


@app.route("/")
def index():
    return render_template("index.html")

@app.route("/video_feed")
def video_feed():
    return Response(generate_frame(),
        mimetype = "multipart/x-mixed-replace; boundary=frame")


def generate_frame():
    global output_frame, lock

    while True:
        with lock:
            if output_frame is None:
                continue
            (flag, encoded_frame) = cv2.imencode(".jpg", output_frame)
            if not flag:
                continue

        yield(b'--frame\r\n' b'Content-Type: image/jpeg\r\n\r\n' +
            bytearray(encoded_frame) + b'\r\n')

def streaming():
    global stream, output_frame, lock

    with lock:
        frame = stream.read()
        if frame is None:
            logging.info('Error reading first frame. Exiting.')
            exit(0)
        output_frame = frame.copy()

    while True:
        with lock:
            frame = stream.read()
            output_frame = frame.copy()


 __name__ == '__main__':

    t = threading.Thread(target=tracking)
    t.daemon = True
    t.start()

    app.run(host='192.168.100.100', port=8888, debug=True,
            threaded=True, use_reloader=False)

    # release video stream before closing
    stream.stop()
Running this code on the observer using python3 server.py and then visiting 192.168.100.100:8888 from any machine in the same network as the observer should produce a webpage with the stream!
Which it does!!

13) Annotate frames
Finally, to make sure that our setup works well with OpenCV, we aim to annotate the frame fetched from the camera before it is redirected to the stream, for example by adding the date to each frame. The function below can be called between fetching the next frame from the camera and setting the next output_frame.
OpenCV works with images stored as arrays of pixels, which contain colour values for blue, green and red (note the order: BGR rather than RGB) and optionally alpha. These arrays are passed by reference and not by value so we need to copy them explicitly when making changes.
We can load and dump images to disk using cv2.imread and cv2.imwrite. In our headless setup, cv2.imshow will have no effect, as that function is used to draw the current image on the screen inside a GUI.
import cv2
import datetime
import numpy as np

def annotate(
        frame: np.ndarray, path: str
    ) -> np.ndarray:

    timestamp = datetime.datetime.now()
    frame_annot = frame.copy()
    cv2.putText(frame_annot,
        timestamp.strftime("%y-%m-%d %H:%M:%S"),
        (10, frame.shape[0] - 10), cv2.FONT_HERSHEY_SIMPLEX,
        0.5, (255, 255, 255), 1)

    cv2.imwrite(f"{filename}_{timestamp}.jpg", frame_annot)

    return frame_annot
The function above annotates the stream with the current date and time and also saves it to disk.
In future iterations, we will explore OpenCV’s object detection and motion tracking algorithms in order to most efficiently extract trajectories from the motion of players. We will rely on the green pilot lights, and hopefully gather a group of people to collect some real motion data. Stay tuned!
Bibliography
Instructions for how to configure and use the Raspberry Pi Camera and Getting started guide
A great article about how to build a remote viewing camera with Raspberry Pi is on Makezine.
pyimagesearch.com is a great resource to learn OpenCV in Python and set it up on Raspberry Pi.