Introduction
Around the beginning of February, our intercom became restless. For a few days, deliveries came in a frenzy. Boxes over boxes: Raspberry Pis, routers, batteries, spools of solder and dozens of metres of LED lights conquered our living room, which soon became a mess of circuit boards, cables, boxes and antistatic packaging, chargers like an octopus spreading its cables, and of course, lights, cameras and tripods to document the whole pursuit.


For a few days, our house became the brightly-lit den of a cyberpunk secret society, and in the middle of this I sat at my screen, orchestrating.

All this, so we can build, and then deploy, ten headsets for the Synch.Live project for our pilot experiment: an attempt to see if humans can move as one, without language.
This article is part of a series describing my collaboration with Hillary Leone on Synch.Live. To summarise, Synch.Live is a game in which of groups of strangers try to solve a group challenge, without using words. We will use a specially-designed headlamp, simple rules and a just-published algorithm to create the conditions for human emergence. A discussion about emergence and the goals of the project is in a previous article.
Instructions
The network configuration is discussed in the next section. The process of deploying a hat is now mostly automated, using pre-configured files, a shell script, and orchestration software Ansible, and consists of three main steps:
- Building the player hat based on the prototype designed in the previous post.
- Setting up the OS on the card - instructions & code
- Deploying configuration and software using Ansible - instructions & code
If you would like to know more about how everything works and how we achieved this fast and slick setup, and better understand the tools we use to deploy Synch.Live, then continue reading. Otherwise, for a quick setup, see the README files in the code repository.
Network setup
Let’s start by talking about how the headset computers will be connected, and how they will be talking to each-other. Our system will consist of 10 Raspberry Pi connected to the same local network, configured for this purpose on subnet 192.168.100.0/24. The router should be at 192.168.100.1.
We have 10 players, and for convenience, we’d like some sort of consitency between the hostnames, player1 to player10 and the IP addresses, for example 192.168.100.101
to 192.168.100.110.
When you connect to a network, the routers or other networking hubs use DHCP (Dynamic Host Configuration Protocol) to assign an IP address automatically to your device.
In most cases for home networks, the assigned IP address something like 192.168.0.xxx.
Once an IP address is assigned, it will not change as long as the router doesn’t get turned off or the device doesn’t remain disconnected from the network for longer than the DHCP lease time. We cannot guarantee that the same IP address will be allocated again by the use of DHCP alone. In short, there is no certain, deterministic way to use DHCP for our goals, without extra setup.
Enter static IP addresses. Each RPi is delegated an IP address which is set in its configuration files and never changes. When it connects to any network, as long as no other device has the same IP address, it will use its pre-allocated static IP address.
A crucial step in the initial setup, after the operating system is installed onto each RPi, will be to assign a hostname and an IP address to each sytem.
Router model
First, we bought a beast of a router: Netgear Nighthawk X6. A tri-band router boasting speeds that reach Gigabits (plural, Gigabits), can automatically load-balance between different bands to make sure none gets overloaded, covers a larger area than any router should really cover, and as the specs brag, supports up to 55 devices.

Sorry, wrong Nighthawk!

Still, look at those beastly antennas! It even has a dual-core processor and runs funky clever software that allowed us to configure the network simply by using the web frontend at https://routerlogin.net, without having to dwell into the innards of network programming.
Router configuration
We configure a WPA/PSK network with our desired name and password. PSK (Pre-Shared Key) is an authentication method for WiFi designed for home and small office networks where every user has the same passphrase. This same name and passphrase will be added to the wpa_supplicant.conf file in the following steps and will be used by all the Synch.Live player headsets to connect to WiFi.
As this is a tri-band router, we set the network name and password to be the same for all bands so our devices only need to store a single set of credentials. Moreover, this allows us to use improved load-balancing. See this screenshot for clarifications.
We also configure the router subnet to be 192.168.100.0/24, and finally, to make sure that no other devices are allocated a player IP address by DHCP, we only allow DHCP to allocate addresses in a specific range, that is, 192.168.100.1 to 192.168.100.99, like below:
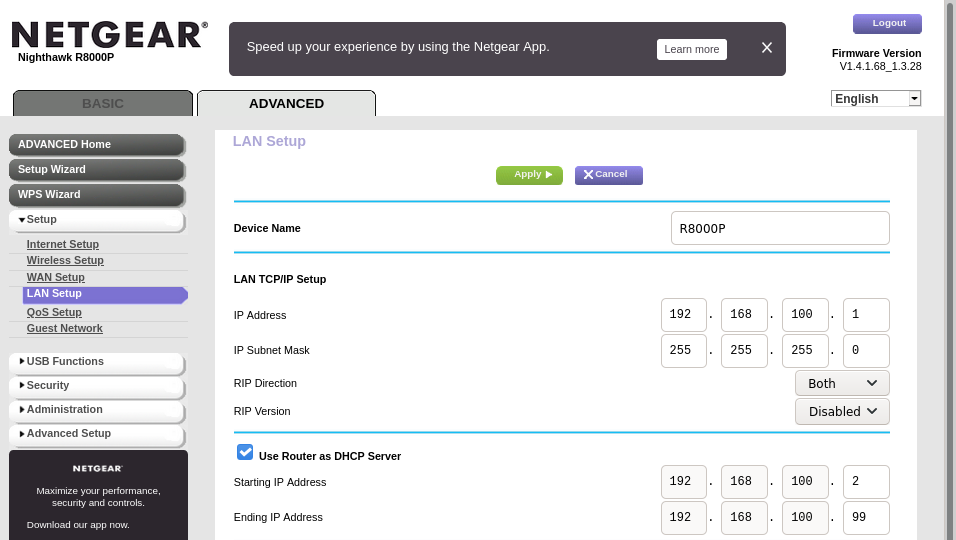
I’ve gone through a few hiccups before finding the settings above, amongst others to reserve the IP addresses, and also to disable DHCP with painstaking outcomes. Tl;dr don’t disable DHCP on your router. It will be nightmareish.
SSH keys setup
We aim to communicate with the individual devices via Secure Shell (SSH). Moreover, the orchestration software Ansible relies on SSH to send commands to the remote machines.
To avoid possible security risks when using a username and password pair to login, and also to make our deployment pipeline faster, we employ the use of SSH authentication keys instead.
SSH key pairs consist of a public part and a private part. These two combine mathematically, like a key fits in its lock. You must protect the key, and not lose it and not let anyone duplicate it. On the other hand, the lock is in a public space, and it can be seen and exposed to others.
Similar to the above analogy, the private key resides with the user, and is normally stored encrypted or on a secure hardware device like a Yubikey. The public key can be shared with all users and devices which the owner aims to unlock with their private key.
We wish to do the same for our system: to generate a public/private key pair, keep the private key safe, and copy the public key to each headset that we deploy. On Linux-based systems such as our Raspberry Pi OS, public keys are stored in the file .ssh/authorised_keys located in the home folder of a certain user.
We first generate a public/key pair by using ssh-keygen.
The command below will create two files, synchlive and synchlive.pub which are your private and public key.
$ ssh-keygen -t ed25519 -N "passphrase" -C "user@host" -f .ssh/synchlive
The -N flag allows you to provide a password to encrypt the private key. -C is a comment that helps identify your key. I prefer to use user@host, so I remember what is the user and the hostname this key is for, so for example pi@player.
ed25519 refers to a fast and secure signature scheme using an elliptic curve, a standard which requires much shorter keys than other schemes.
In the following section, where describe explicitly how to get started each player headset, and make use of the public key generated above.
Player setup
The steps below are the minimum necessary to get the operating system for the RPi up and running on an SD card. A script that automates all the steps described is also available.
1) OS installation
In the previous articles, we’ve been using Raspbian (now renamed to Raspberry Pi OS) as the operating system for our headsets. But RPi OS is an educational tool which comes with plenty of programs and libraries we do not need, so instead, we use the Lite version.
An alternative to this could be DietPi which we may use in the future if we need an even slimmer distro.
We image the SD cards using dd (command line) or Balena Etcher (GUI disk imaging software).
A few more setup steps are required before we can put the card into the RPi. After these steps are completed, one should be able not only to login remotely into the RPi wia SSH, but also to use Ansible to automatically install software and configure the kernel modules and other setup we need for our hardware (the clock module and the lights).
For this, both partitions on the SD card /boot and /rootfs should be mounted.
2) Enable SSH
As previously, this only requires adding an empty file ssh into the /boot partition.
When the OS first boots, it will identify the existence of this file, enable SSH, and then remove it from the /boot partition.
3) Connect to wireless
On many Linux systems, the WPA supplicant is a program that runs in the background and controls the wireless connection. Its config file, normally wpa_supplicant.conf, contains the network name (SSID) and password required to connect to a wireless network and authenticate via WPA.
This file normally lives under /etc/wpa_supplicant, and an example for this config file is normally in the same directory under example.conf. To connect to a wireless network, the file should contain the lines below.
ctrl_interface=DIR=/var/run/wpa_supplicant GROUP=netdev
update_config=1
country=GB

network={
     ssid="[SSID]"
     psk="[PASSWORD]"
     key_mgmt=WPA-PSK
}
To streamline the headless setup of a RPi, one can employ a similar trick as we did for SSH.
Including the wpa_suppliant.conf file into the /boot partition will cause the system to take notice of the wireless network at first boot.
The file will then also be moved to its correct location, and if the credentials are correct, the RPi should connect to the network automatically.
4) Setting hostname
In previous articles, we used raspi-config to setup the hostname after we connected remotely.
Now we want the hostname to be already set even before first boot, achieved by setting the desired hostname in /rootfs/etc/hostname.
5) Setting static IP address
On Linux-based systems, the file dhcpcd.conf normally lives in /etc and contains configuration for DHCP.
This file is used to describe the properties of various networks the current system may connect to, and how exactly to do so.
In our case, we wish to configure the wireless interface wlan0, which we only allow to connect to a single network, as we previously specified via wpa_supplicant. We can do so by specifying the current’s device static IP, and the router’s IP. The relevant config we used is, for player1 at IP address 192.168.100.101:
interface wlan0
static ip_address=192.168.100.101/24
static routers=192.168.100.1
static domain_name_servers=192.168.100.1 8.8.8.8
Appending the above declaration to the standard dhcpcd.conf that already exists in /rootfs/etc/ is enough to configure a static IP address for our system.
6) Copying SSH keys
Finally, you should copy the contents of the public key generated at the beginning to a file called authorised_keys on the RPi in /rootfs/home/pi/.ssh.
In this way, every time you try to login to a headset from a machine that uses the private half of that key, the handshake will be completed without the need of manually providing a password.
Automation
We love automation so much we automate automation.

Since everything described above needs to happen for each player, I’ve gathered all the steps into a shell script. I also made available the skeleton files required to perform the setup in the same repository.
After instaling Raspberry Pi OS lite onto the card, assuming an SSH keypair has been generated, the script can be run from the setup folder in the repository according to the README, with the player number as a flag.
$ ./setup_sd_card.sh [player_number]
And done! Now if all went well, you should be able to put the card into the RPi, turn it on, and be able to connect to it via SSH, using the username pi and its static IP address.
Verification
Considering the above done for all hats, it’s time to turn them all on and marvel. They need a few seconds to boot, after which we can do a network scan, to see if all hats have correctly connected.
$ nmap 192.168.100.1/24
The players themselves have a single port open, and a single way to communicate over the network, via Secure Shell. The router runs plenty other services, as routers do.
Nmap scan report for router-netgear (192.168.100.1)
Host is up (0.038s latency).
Not shown: 993 closed ports
PORT      STATE SERVICE
21/tcp    open  ftp
53/tcp    open  domain
80/tcp    open  http
631/tcp   open  ipp
5000/tcp  open  upnp
8200/tcp  open  trivnet1
20005/tcp open  btx

Nmap scan report for player1 (192.168.100.101)
Host is up (0.00016s latency).
Not shown: 999 closed ports
PORT    STATE SERVICE
22/tcp  open  ssh

Nmap scan report for player2 (192.168.100.102)
Host is up (0.00016s latency).
Not shown: 999 closed ports
PORT    STATE SERVICE
22/tcp  open  ssh
… and so on until player10.
Orchestration
Now that all machines are online, it’s time to get them ready to run our LED control software. For all the steps described in previous posts, we aim to find the simplest, fastest way to configure them, and then aggregate all these steps in a list of tasks to be performed automatically.
This is precisely the role of software orchestration: the automated configuration, coordination, and management of computer systems and software. There are plenty of tools available that can perform this, and most of them are open source. They differ in features, configuration language, and whether you use them to provision a server, or only just to configure it.
Sensible Ansible
The term ansible was coined by Ursula K. Le Guin in her 1966 sci-fi novel Rocannon’s World. The word refers to an interstellar communication system that is instantaneous, and has been reused since by other sci-fi writers (as well as software writers!)

Ansible is an open source automation tool made by Red Hat that you install on a computer called a control node and you use to manage other machines remotely. It’s neither interstellar nor instantaneous, but it’s simple, and it’s fast.
Although I’ve not used it before, Ansible was recommended to me by the Adaptive Emergent System Engineering group at Imperial College as a very good tool to deploy large numbers of small, independent devices.
Ansible uses a mutable infrastructure paradigm and a procedural programming style. This allows for greater flexibility, although it’ll certainly cause troubles in more complex projects, where the system needs to be frequently updated. Ansible does not need to be installed on individual machines, and does not require a server, a daemon, or a database to store all the configuration: it’s agentless and masterless. This is also in our advantage, as we do not have to deploy other machines, and we reduce the number of steps to setup a single player.
For what it’s worth, Ansible is also the orchestration software with the largest number of contributors on Github. Thank you, community!
Getting started
1) Inventory
After installing Ansible on the control node (in my case, my laptop), the first step is to create an inventory. An inventory is a file that contains information about the machines that should be controlled remotely, either by their IP address or hostname.
On Linux, an example inventory file should be present in /etc/ansible/hosts. One may create their own hosts file in their working directory, in which case the one in /etc would be ignored. Actually, Ansible has a prespecified order in which it looks for inventory and configuration files, first by interrogating environment variables, then in the current working directory, then in the home directory, and only afterwards in /etc/ansible.
We can also declare groups of machines. In our case, we will have a group for the players that is separate from other machines we may deploy for this system. Variables can be assigned to both individual hosts and groups, which are useful to configure various defaults for Ansible that only apply to those hosts or groups of hosts.
For example, we can create an entry in the inventory for all the players, by creating the group [players].
[players]
192.168.100.[101:110]
and then add variables for the players, by using the header [players:vars].
One such variable is to configure the default Python interpreter to be Python3, as this is the Python version used by the LED control code.
[players:vars]
ansible_python_interpreter=/usr/bin/python3
Assuming that previous steps were completed and all headsets are turned on, one should be able to use Ansible to check if they are online! The simplest way is to send a ping probe to each device and see if it responds…
$ ansible players -m ping -i hosts -u pi --key-file .ssh/synchlive
we address all machines in players, as listed in the inventory (-i) we created in the file hosts, using the module (-m) ping, and the user (-u) pi. We use the private key we have generated, synchlive, to authenticate.
After a brief time, we expect 10 responses from the 10 players, since we established when doing the network scan that the 10 of them are already online.
You can also list the machines in a group by running
$ ansible players --list-hosts
2) Config
To avoid having to pass flags all the time, Ansible also uses a configuration file, ansible.cfg, where program defaults and other behaviours that are not directly related to a specific machine can be specified. An example is located in /etc/ansible/ansible.cfg.
We add the following configuration to include our defaults:
inventory        = hosts
remote_user      = pi
sudo_user        = root
private_key_file = .ssh/synchlive
Now we can rewrite the above command as
$ ansible players -m ping
Since we will be installing software, Ansible should ask for the superuser password when it needs to perform an elevated command.
ask_sudo_pass = True
Before running any tasks, Ansible by default gathers facts about the systems it’s orchestrating. This option is turned on by default, but it’s rather slow, so instead we choose to explicitly ask for these facts when we want them.
gathering = explicit
Especially when fact gathering is explicit, it may be useful to run Ansible only for the purpose of gathering facts:
$ ansible players -m gather_facts
Plenty other things can be configured, but this should be enough to get us started. We save it as ansible.cfg in our working directory.
3) Modules
In order to perform tasks, Ansible provides a multitude of modules that allow users to refer to various pieces of software. For example, we used ping to send a ping probe to all the hosts in players, and shell is the module used to run shell commands. Each of these modules take extra key-value pairs, for example to pass them flags, or to capture the command’s output.
For example, to update package cache in apt for all our players, the apt module is used:
$ ansible players -m apt -a update_cache=true --become --ask-become-pass
and to install vim everywhere
$ ansible players -m apt -a package=vim --become --ask-become-pass
4) Plays and playbooks
The hierarchy of work in Ansible is split into, tasks, which are gathered together, sequentially and procedurally, in a play. Multiple plays are gathered in a playbook. We can annotate plays and playbooks with names, tags and other variables, in order to tell Ansible what machines to run it on, under what conditions, and with what outcome.
Playbooks are written in YAML, a simplish markup language with key-value pairs. A playbook runs in order from top to bottom. Tasks in a play run in order from top to bottom.
Ansible spawns a number of threads (5 by default), which run a play on each machine in parallel. Since we have 10 players, we will run Ansible with 10 threads (using the forking flag -f 10), and Ansible will start the commands in parallel on each machine, then sequentially go through the same setup steps for each of them.
Player Deploy
Here they are! They’re ready to shine and to dance! It’s time we deploy software to them and have a party!

We focus on the following playbooks required to deploy the players:
- to copy config files and enable the interfaces used by the Real Time Clock and the LED lights - this will only need to be done once
- to install and update software packages - this may be done every time there is an update to the softare
Hardware Config
We make use of the command-line version of raspi-config to enable the SPI, GPIO and I2C interfaces. Note that 0 means enabled.
$ sudo raspi-config nonint do_spi 0
$ sudo raspi-config nonint do_i2c 0
$ sudo raspi-config nonint do_rgpio 0
The following play enables the SPI interface if the param SPI is set to True. We specify become:true as superuser priviledges are needed to do the tasks below. The same can be done for the other interfaces.
- name: raspi-config
  hosts: players
  become: true
  vars:
    SPI: True
  tasks:
    - name: Get SPI status
      shell: "raspi-config nonint get_spi"
      register: spi_status
    - name: Print SPI status
      debug:
        msg: "SPI status is: "
    - name: Enable SPI
      shell: "raspi-config nonint do_spi 0"
      when: (SPI == True) and (spi_status.stdout != '0')
The register key is used to save the output of the shell command into the variable spi_status, while the when keyword acts as a conditional.
To copy off files, we use the Ansible copy module. The owner, group, and mode allow specifying file permissions through the copy module as well. For example, the following play will copy a hosts file located in an etc subfolder to each player.
- name: Copy off other config files
  hosts: players
  become: true
  tasks:
    - name: Copy hosts
      copy:
        src: etc/hosts
        dest: /etc/hosts
        owner: root
        group: root
        mode: 0644
More advanced ways are available to modify files, but for now it should be more than enough to copy and overwrite the config files.
We save the two plays in a playbook, config-hardware.yml. Watch out for spaces and tabs - indentation is very important to YAML syntax. To run the playbook
$ ansible-playbook config-hardware.yml -f 10
The playbook assumes the files required for setup are included in the files subfolder
files
├── boot
│   └── config.txt
├── etc
│   ├── hosts
│   ├── modules
│   └── systemd
│       └── timesyncd.conf
└── lib
    └── udev
        └── hwclock-set
Software Installs
In the next playbook, the apt module is used to update cache and install software.
- name: Install necessary software on all players
  hosts: players
  become: true
  tasks:
  - name: Update cache
    apt:
      update_cache: yes
  - name: Install Python3, pip, and Python interfaces for SPI and GPIO
    apt:
      name:
        - python3
        - python3-pip
        - python3-spidev
        - python3-rpi.gpio
      state: latest
  - name: Install I2C interface tools
    apt:
      name: i2c-tools
      state: latest
and the pip module is used to install Python packages
- name: Install pip packages
  tags: setup
  hosts: players
  tasks:
  - name: Upgrade pip & setuptools
    pip:
      name:
        - pip
        - setuptools
      state: latest
  - name: Install pip packages
    pip:
      name:
        - adafruit-ws2801
        - logging==0.4.9.6
        - asyncio
Upgrading pip and setuptools together has saved me a lot of trouble and has successfully upgraded pip, something which my system’s Python doesn’t always manage to do.
The two Ansible playbooks and config files are available on github. We also include a script that reboots all devices.
And finally, we can use Ansible to copy off any other code files using the copy module, and we can schedule for example for all the LEDs to turn on at the same time using the cron module.
The next step is to write Ansible playbooks that synchronise the clock for all players, runs battery and stress tests, and can mock the random blinking behaviour of the players becoming more synchronised. We will play with clock syncrhonisation protocols, and we will have so much fun…
         ____________________
        /                    \
        | until next time... |
        \                    /
         --------------------
                \   ^__^
                 \  (oo)\_______
                    (__)\       )\/\
                        ||----w |
                        ||     ||
Bibliography
An article explaining DHCP configuration on Linux, and more reference articles about headless WiFi setup, network configuration and setting up static IPs on a Raspberry Pi.
More Sci-fi geekdom about Ansibles and fictional communication devices.
I am thankful to Jay & team for the excellent Ansible tutorial on LearnLinuxTV and to giuaig for hosting the definitive raspi-config playbook.
For the customisation geeks out there, Rocannon is a tool that makes writing Ansible playbooks in Vim a great delight.