Of plants and men
Three years ago, when I was living in Bath, I used to walk past this tiny shop called Honeybears every time I went to work. It was always closed. Looking through the dusty window, I guessed a lot of vegetation, some appropriated ethnic decorations such as dream-catches, golden smiling Buddhas and the obligatory Maneki-neko at the uncanny valley between creepy and cute beckoning with its robotic arm, and all sorts of knick-knacks and paraphernalia whose purpose I initially failed to grasp. It took more than 5 months until I finally saw the door to the shop open, and a bunch of potted plants taken out to attract customers. I was rushing somewhere, but it didn’t matter. I went in.
The clerk was a new-ager in overalls, had earth under his nails and weeds stuck in his hair. His teeth were crooked but he smiled all the time. He asked me if I wanted to buy a plant. Hell, why not? So I told him I want a plant that is entertaining, and grows inside easily, and he gave me this little babe. I paid £3. He also wrote me a note with the plant’s name: Monstera Deliciosa.
I named him Robert. Robert plant.
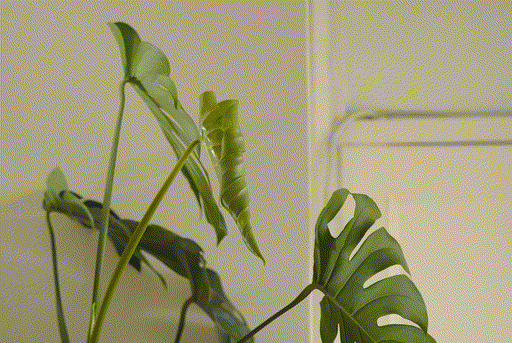
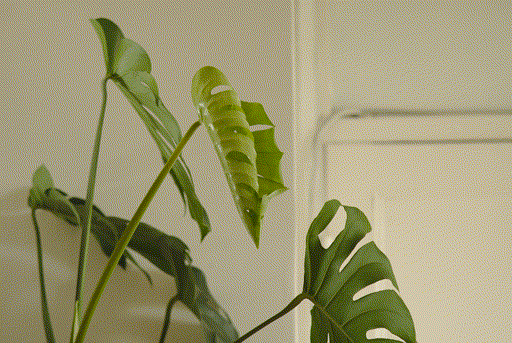
Two weeks later Robert, who originally had 4 leaves, grew a 5th. Then a 6th, another two weeks later, with a tiny hole. Fast-forward to:

When it was first identified in the Amazon jungle, botanists called it Monstera for exactly this reason. It grows like a damn monstrosity.
For each leaf I would spend hours just looking at him grow, and every time I told myself, I must get a timelapse going, this is too incredible, how fast he can grow.
The timelapse community tends to either use a camera designed for this purpose like a GoPro or some built-in function of their photographic camera. But I was an early adopter of the Sony Alpha series, which in the first version, was meant to feature an app store (Sony PlayMemories) where all the software upgrades could be purchased. That, of course, translates to a lot of features missing from my camera: panorama, timelapse, and others.
At some point I found out a fellow hacker has reverse engineered the camera firmware, which for a brief moment looked promising. But the risk of bricking my camera was too large, so in the end I decided I’m going to buy the apps. In the meantime, the PlayMemories store stopped working. I could not purchase anything in the browser, and I even if I could, I wouldn’t purchase it on my camera because I don’t want my camera ever connected to the internet.
Considering the ultra-closed environment here, I had to find alternative solutions. And as I got quite angry, as usual, with the idea of companies that expect me to pay for a black box that doesn’t even work, I became set on doing it only using open source hardware and software (with the exception of the camera, of course).
So this article is a walk through the steps I took to get the timelapse to work on a RPi, but one can connect almost any camera via USB to any Linux machine and the process is quite similar.
Hardware
- Sony A7S on a tripod, with a 55mm 1.8 Takumar lens
- a power adapter (not battery) for the camera
- a Raspberry Pi
- power cable and USB3 cable for the Pi
Depending on the make and model of your camera, as well as the duration of the timelapse, one could do it using the camera’s batteries, but in my case, the A7S battery life is quite short, so for a timelapse spanning several days I would have had to manually swap the battery in between photos maybe even more than once a day.
This power adapter I mentioned is a very nice contraption, it’s basically a battery with a cable that connects it to a power brick that can be plugged in, something like this
Software
Gphoto2
gphoto2 is a FOSS library for intefacing with various camera models and saving the images on a computer.
As the timelapse would last day and night, we would need a way to control the camera’s parameters so the pictures look good, not too dark and not too bright.
Unfortunately gphoto2 does not support too many parameters for Sony cameras, so instead I use fixed values for the aperture and exposure time, and leave the ISO on Auto, as the A7S is famous for high-ISO images. We also left a light on in the background (most of the time).
Darktable
Given the choice to use variable ISO, it’s probably a good idea to shoot RAW images to allow more flexibility in increasing or reducing exposure and to denoise in post. Then since a lot of pictures would be taken I needed a fast way to automate the post-processing. Since most photos would require the same edits, going through them manually inside a darkroom software would have been a sisyphean task.
Moreover, we’d like to use something that is open-source, and if possible has a command-line UI that would allow us to batch process photos. Enter darktable, probably the most powerful darkroom software available on Linux. As usual, the GUI is a disaster compared to proprietary non-Linux alternatives, but it does the job, with support for many useful features, such as proper colour profiles, lookup tables (LUTs), colour filters and colour zones, decent curves and histogram interfaces, various denoisers, blemish correction and liquify, perspective tools, wavelet transforms and other mathematical filters, as well as a bunch of artsy (to be read ‘kitsch’) filters that are a must-have for any photo editing app.
All in all, darktable is a gem, hindered only by it’s bulky UX and strange multi-monitor support Heisenbugs. I am keen to see how it improves, as for the past 2-3 years I’ve been using it I could definitely see it getting incrementally better with every update.
Given the generous set of features, clearly darktable can help with denoising and adjusting exposure, and I use the command line to export the RAW pictures into JPGs.
ffmpeg
ffmpeg has to be one of the coolest and most powerful multimedia tools I’ve had a chance to play with. On top of bundling together the standards for every codec still in use that one can think of, which makes it probably one of the most powerful media converters there are, ffmpeg is also, by far, the most quick and practical tool I’ve found to make animations.
I’ve been making GIFs in Photoshop for years back in the day and nothing compares to the sublime simplicity of using ffmpeg to animate from frames.
One needs a tome to document its features, and below I will only cover a humble subset I used to make GIFs from images.
Process
Camera control
First, I installed gphoto2
sudo apt-get install libgphoto2
and did a sanity check to see if my camera is supported. It is:
pi@piframe:~/PyTimeLapse $ gphoto2 --list-cameras | grep -i a7s
	"Sony Alpha-A7S (Control)"
	"Sony Alpha-A7S (MTP)"
	"Sony Alpha-A7S II (Control)"
gphoto2 supports thousands of cameras, and in some cases advanced features such as controlling exposure time, aperture, picture profiles etc. In the case of Sony mirrorless cameras, though, the features are reduced as the camera firmware is rather closed.
Directly on the camera I set the exposure time to 1/100 and aperture to f2, to make the most of all light in the room. Auto ISO can range from 100 to 400K. I also set the capture quality to RAW.
I hoped the images will be more or less matched in luminosity and exposure, but when the LED light went off for various reasons during the night, the image was too noisy to use, so this explains the gaps in the resulting timelapse.
The command below takes a picture (with the params currently set on the camera) and saves it with the time and date in the name, in the same folder:
$ gphoto2 --capture-image-and-download \
          --filename timelapse-%Y-%m-%dT%H%M%S.%C
%C ensures the file extension is preserved.
The next step is simply to make this script run every five minutes.
Scheduled timelapse
Now we’d like to run this at a certain interval. After making sure it works I didn’t bother with writing logs or other things, since I could always check if it’s actually running just by checking the timestamp of the last save picture.
So I used cron, to setup a scheduled task that runs every five minutes. More about cron in this post. I ran crontab -e and added the below task:
$ crontab -e
*/5 * * * * gphoto2 --capture-image-and-download --filename ~/pi/lapse/timelapse-%Y-%m-%dT%H%M%S.%C
And make sure the folder lapse exists in the home folder of the pi user!
I also added another cron, which uses rsync to copy the photos taken that day to my network drive.
To help with browsing and editing the photos in smaller batches, I grouped them in daily folders, called day1, day2 and so on.
$ tree timelapse
timelapse
├── day1
├── day2
├── day3
├── day4
├── day5
├── day6
└── day7
Photo export
Six days later, the leaf is completely grown and I am faced with almost two thousand RAW image files of 12 megabytes each. I open them in darktable and have a look: the ones that are well exposed require little input, and the ones that are badly exposed are basically unusable, because they were taken in pitch darkness. So after a little bit of tweaking, an XMP metadata file is added in the same folder as the image containing the edits I made.
To export in the command line, it’s as easy as
darktable-cli photo.raw photo.jpg
Because there’s a lot of files, and my laptop is not the most graphically gifted, I thought this time maybe I should be a little more neat about the process and to log what is going on, so I wrote a little bash script that takes an input and output folder and then exports the images from day 2 to day 7:
if [ "$#" -ne 2 ]; then
    echo "Usage: ./export_all.sh in/ out/"
    exit
fi

indir=$1
outdir=$2

if [ ! -d "$indir" ]; then
    echo "Directory not found: $indir"
fi

mkdir -p -v $outdir

for i in 2 3 4 5 6 7; do
    echo "day$i"
    for file in day$i/*.arw; do
        [ -e "$file" ] || continue

        name=${file%.arw}
        name=${name##*/}
        name="$outdir/$name"

        echo "Exporting $file to $name.jpg"
        darktable-cli   "$file" "$name.jpg"
    done
done
The subfolders should be navigated through or passed in as a flag instead of hardcoding, but it does the job.
Animation
ffmpeg can take in a bunch of images using glob patterns using the -i (input) flag and then output to the file given as the last param.
It normally infers the types of the files from extensions and does an implicit conversion. So if you anted to convert an MP4 to GIF, for example, all you have to do is put in the right file extensions.
The -vf (video filter) parameter takes comma-separated named arguments for a multitude of filters an configurations.
In my case, I started with setting 12 frames per second (which is half of the frame rate of movies, but what a lot of traditional animation used).
It took me a little to understand the -framerate flag refers to the input, not the output. So if I specify a framerate of 12, the output would still have 24 frames per second. Depending on the extra filters used it may duplicate frames or simply loop through the frames twice as fast. Although it looks the same, we don’t need all 24 frames in the output as this makes the GIF twice as large.
The scale parameter in video filters is especially nifty, as it allows to maintain aspect ratio by using -1 for the other value.
The command below was to simply chain the images one after the other, displaying 12 per second. I selected one image per hour to produce an ensemble of the whole process:
ffmpeg -framerate 12 -i out/%2d.jpg -vf 'fps=12,scale=640:-1' -r 12 12fps.gif
Then I wondered, given the background stays mostly the same, could I blend the background somehow and make the animation more fluid? After looking through Stackoverflow, guides, and the massive tome documenting the ffmpeg flags, I found two crazy options: interpolation and blending.
ffmpeg -framerate 12 -i out/%2d.jpg -vf 'scale=640:-1,minterpolate=fps=24' -r 24 interpolate.gif
ffmpeg -framerate 12 -i out/%2d.jpg -vf 'scale=640:-1,tblend=all_mode=average' -r 24 blend.gif
I also learned that forcing an input framerate of 12 and an output framerate of 24 will do some soft blending between consecutive frames.
ffmpeg -framerate 12 -i out/%2d.jpg -vf 'scale=640:-1,framerate=fps=24' -r 24 24fps.gif

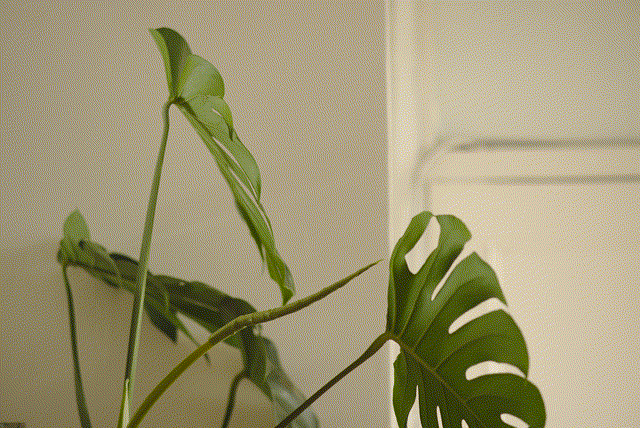
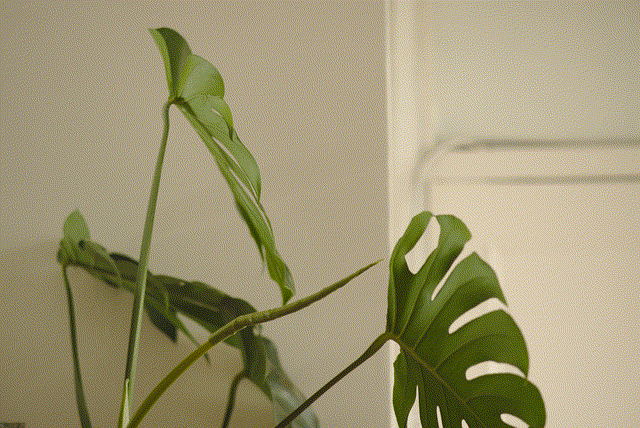
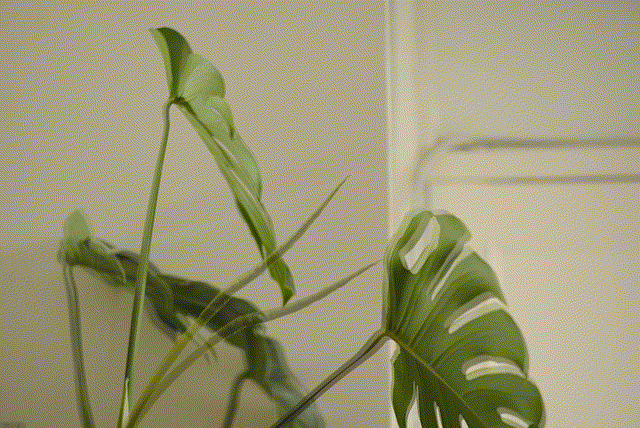
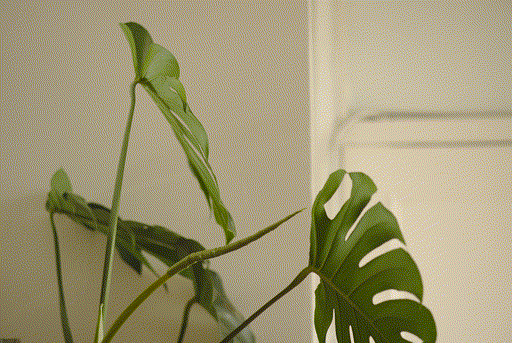
Final results
The files below only used a small percentage of what I captured. Below, I give you, the beautiful process of plant growth. Look how it dances and turns after the sun!
Problems
The above set of instructions makes this whole process sound like it was seamless, right? But the final results consist of three different GIFs, because the time lapse was at times interrupted and I was unable to recover enough images for a continuous lapse.
The first hiccup was an error when trying to connect to my camera. I had to discuss with the developers of gphoto2, who were actually very responsive and helpful so I moved on.
Then, the card I had put in the RPi had run out of memory; although I was using rclone to copy the images at midgnight onto my main network drive, I had forgotten to also delete them.
Because of not setting up any kind of error prevention, and was too lazy to log what is happening or to setup cron to email me if any issue occurred, I only discovered this fault when I got back from my day-long cycle ride, and to my despair I discovered more than 12 hours of missing material. Alas.
Finally, at times my flatmates had turned off the light, and even with the magic of ISO 400,000, I was unfortunately still unable to recover something that would look good enough from pitch darkness.
But in case you’re curious, it looks like a phone snapshot from 2003 (still impressive if you ask me - it really was pitch dark):
Closing thoughts
Making a timelapse of a leaf grow was an interesting technical pursuit but also illuminating in matters of life. There’s something truly remarkable about how Monstera develops, and how even with 5 minute intervals one can see distinguishable motion and growth. As Robert is now in his plant teenage years, it takes him about a month to grow a leaf, with the most entertaining part being what I deem the ‘unfolding’, which takes about a week.
If you stumble upon this and find this article useful, please take some time to appreciate the amazing nature of this plant, and of plants in general, and the kind of computation this plant must be doing in order to optimise the growth of its leaves so beautifully.